Showing posts with label nb0. Show all posts

Step By Step Procedure for Updating to SuperAOSP [Videocon Zeus]

I have tried almost all available custom roms for the commtiva z51 or videocon zeus (spice mi 300 , Orange Boston variant) . For 2.2 Froyo its Android -ID by our very own Tj_style and Phantom ROM and Jellybean have been found very very stable and efficient.But we need GingerBread now. There has been no official update from FOXCONN international holdings. :)

The cyanogen team and some other individual devs or they together as a team work has been continuosly porting  the latest builds each and every day with new features and bug fixes. But we need to put a last stable release. The primary and most important concern for  every user is BATTERY LIFE and RAM MANAGEMENT. All other features like GUI looks and feel will come second.

Well I suggest SuperAOSP build. Even cyanogen Mod now comes with the superAosp kernel which has a better battery management and ram management. The most irritating issue of SD CURRUPTED/REMOVED error is first fixed by this kernel mod form Super@osp team.

Well enough with the talks and lets go to the procedure 

First As usual Back Up all the apps and data with Titanium back up or anyother program of your choice.
Dont forget to backup ur SMS with SMS Backup & Restore program.
Now for added safety we take a Nandroid backup of full ROM using our Favorite Clockworkmod 4.0.0.9
Then Copy all the SD Card contents to PC ( Yes  i reccomend making a full back up of SD card to PC)
We might do a repartition for SD Card since the SuperAosp supports App2SD-ext and SWAP very efficiently
Now that i believe you have successfully taken a full backup of all most all sensitive or important data of your present system. Now we proceed to the updation process.

Since this SuperAosp comes as a UPDATE.ZIP format you might lose the RADIO or IMEI if you are NOT updating from a STOCK FOXCONN ROM. 

So i Suggest to get these Files in hand / PC  well before you start the process 
1. Foxconn ROM 2.2  official 
2. Super AOSP 4.8 superAosp_4_8.nb0 
3. SuperAOSP 8.6  UPDATE.ZIP with AW (anti wipe means preserves your data ) 
4. Latest Kernel Fix ( not recommended since i couldnt test it and i have heard from the guy who bought my phone having terrible battery issues . Only do this if u want to do a testing )

Once update has done you might need these files to make your zues look like its Videocon official

1. Splash Img 
2. Boot animation.
#3 Someone will provide a way to edit the Phone INFO menu .

FOR THOSE WHO INTERESTED TO USE APP2SD and SWAP 

Do this before the steps Else skip to next section.

In CWM recovery > Go to advance > Partitio SDcard> 
512 mb Ext 
64mb swap

The Steps are as follows

1. Connect your phone in Download mode to pc and Update using SUTLR 
   First UPDATE with FOX OFFICIAL ROM (if your already on official rom skip this step)
2.Just as the first update is finished you can switch off the phone and again boot into Download mode
3. Now select Super Aosp 4.8 nb0  and do the update with SUTLR 
4. After update make sure you have booted the phone to normal mode and u have a valid signal (IMEI) 
5. Now you can copy the Super Aosp AW 8.6 Update.zip to memory card
6.Reboot To CWM Recovery Update using option UPDATE.ZIP 
7. Reboot the phone to see you have a valid signal (Anti Wipe was designed to save time for those who were already using superAosp before. But if you switch from CM7 or any other Custom rom you need to start all over from beginning to get a VALID SIGNAL .

If things go well make a CWM Nandroid Back up of this raw SuperAosp and you can restore it in case of emergency.
Now if you copy the Titanium Backup Folder back to the SD card and you can Restore all the apps and use the phone like you were using from before :)

I have to Credit all these wonderful blogs,people and their undconditional service and support as for these information stated above is only possible just cos they shared it for the mankind :)

boston-mania.blogspot.com
all-4-andoid.weebly.com
SuperAosp team for this wonderful best i should say ROM
Cyanogen mod team for the continous support and devoloping they are doing
Kaushik dutta for the stepping stone ... CWMRecovery without it ..all this would have been a big joke.
Akong / amon_RA another great recovery. 
and anyone if i have missed :) 

A great tutorial from a Thai forum


The whole of this tutorial is a with the help of google translate. Much editing correcting is required. First of all thanks to the original post and all the guys behind the original forum. do check them at here. 
A big thanks to k0ng :)


** I took out link offline I see that someone has started a 2.1, this file is not available for offline ** 2.1.
custom recovery rom A88 can do for people without flash App2SD boot partition in the partition can be divided into steps I detailed a bit offline. To understand the process.
Files and the next step for this particular Wellcom A88 1.6 can not be used with other versions.
**** A88DS-recovery change log ****.
1.6.0.2 [5/5/2010].
--- Add the menu to the right off the root of the machine.
Properties A88DS-recovery rom.
1. Toggle USB SD card via the SD Card off usb without having to OS.
2. Backup / Restore for backup partiton boot, data, system and app2sd ext.
3. Flash zip update.zip Flash files or other files with the extension. Zip.
4. Wipe clear machine factory reset.
5. Partition SD card in the sd card partition divided for making App2SD.
6. App2SD enable App2SD.
7. Enable / Disable Root was right off the root.

What needs to be.
1. Cable to usb, fastboot and driver for the ADB interface ->. A88 Tools.
2. A88DS-recovery rom downloaded from -> recovery-a88ds-v1.6.0.2.img.zip.
Installation A88DS-Recovery. (for that never made app2sd from other methods.)
There was major.
0. Wipe (Factory Reset).
1. Install driver, fastboot and test Rom.
2. flash Recovery rom.
3. Do Backup.
4. Do App2SD.
0. We add additional steps to prevent use Wifi I do not have offline.
0.1 go to Setting> Privacy Select Factory Data Reset.
Doing a factory reset to clear out all data in the machine.
1. Install driver, fastboot and test Rom.
1.1 unzip A88_Tools and the file recovery-a88ds-v1.6.0.2.img to stay in the same folder as fastboot.exe crack zip to the C: \ a88_tools.
1.2 Close the connection.
1.3 Connect the usb.
1.4 to fastboot mode by pressing the button End call button [DROP] + [Volumn Down] + [Power] to power.
1.5 equipment will remain on the screen Welcome (waiting to make sure that the machine is not accessible in normal mode) If windows ask to install drivers from the driver to select A88 Tools.
1.6 If the driver installed successfully in Device Manager of windows will have a device that ADB Interface.
1.7 Go to menu Start -> Run .., type cmd, and then ok.
1.8 In the window that opens. Change the folder to unzip to come out like
cd c: \ a88_tools.
1.9 Testing and fastboot a88ds-recovery. To ensure that the work with commands.
fastboot boot recovery-a88ds-v1.6.0.2.img.
Then press Enter.
1.10 If everything is correct, see below.
downloading 'boot.img' ... OKAY.
booting ... OKAY.
Screen and the connection mode to recovery.
** If you are not forbidden to continue. Turn off the machine, disconnect and remove the battery and try again **.
1.11 Power off choosing the menu and press the track ball 1 time machine is turned off.
2. flash Recovery rom.
2.1 Press the call button [DROP] + [Volumn Down] + [Power] to power once again.
2.2 Connect the usb.
2.3 Go to menu Start -> Run .., type cmd, and then Ok.
cd c: \ a88_tools.
Flash 2.4 recovery image with the command.
fastboot flash recovery recovery-a88ds-v1.6.0.2.img.
Then press enter.
Wait for the 2.5 that
sending 'recovery' (3632 KB) ... OKAY.
writing 'recovery' ... OKAY.
2.6 When done, add to reboot.
fastboot reboot.
3. Backup.
The sd card should have a space of not less than 200 MB.
3.1 off.
3.2 into recovery mode by pressing Camera [Camera] + [Volumn Up] + [Power].
3.3 Scroll to the menu Backup / Restore press track ball to select it.
3.4 Nand backup selection, press track ball and press the Home button to confirm.
3.5 Wait until the backup is complete, press Back to return home.
3.6 Select Reboot system.
OS 3.7 to normally mount sd card.
3.8 on a PC open to Removeable drive sd card and copy all data stored in the computer (check that the Folder nandroid should have a file system.img, data.img, boot.img).
3.9 Once all the data copy. Off, then press into recovery mode again.
4. App2SD.
* Split partition sd card sd card to make the information on all missing
4.1 break new partition by selecting the menu Partition sdcard.
4.2 Select Partition SD.
4.3 Press Home to confirm.
4.4 Swap-size set to zero by using a track ball spin up - down to adjust.
4.5 on Swap-size = 0 MB, then press Home.
4.6 Set Ext2-size = 512 MB, then press Home.
4.7 Press the Home button again to confirm. Program will split the partition.
4.8 When done, press the Back button to return home.
4.9 Choose to Enable App2SD.
4.10 Press Home to confirm.
4.11 When finished, select the menu Reboot system now.
I finished up doing app2sd on to OS and then copy the data to sd card to put back the original.
A88DS-recovery menu.
1. Reboot system now - reboot your machine.
2. Enable / Disable SD Card - SD Card off via usb.
3. Backup / Restore.
--- 3.1 Nand backup backups boot, data, system.
--- 3.2 Nand + SD ext backup boot, data, system, sd ext (app2sd to do it).
--- 3.3 Nand restore the backed up data back.
4. Flash zip from sdcard Flash update.zip zip files or other
5. Wipe.
--- 5.1 Wipe data / factory reset to clear the machine to restart.
--- 5.2 Wipe Dalvik-cache data in clear only dalvik-cache.
--- 5.3 Wipe SD: ext empty sd ext (app2sd to do it).
--- 5.4 Wipe battery status battery status clear.
--- 5.5 Wipe rotate setting clear set rotate.
6. Partition SD Card.
--- 6.1 Partition SD divided partition on the sd card.
--- 6.2 Repair SD: ext check the data in sd ext.
--- 6.3 SD: ext2 to ext3 conversion of the format as ext2 ext3 (not available).
--- 6.4 SD: ext3 to ext4 format to convert the ext3 to ext4 (not available).
7. Enable App2SD enabled app2sd.
8. Enable / Disable Root was right off the root.
9. Power off shut down.
** For those who follow the way of snowwolf725 already have flash boot partition back to the old before I can use offline to app2sd with this method.

How to look up the partition structure of your android phone


This tutorial is for 1.6 only (FTM mode is not available on 2.1)

Setup

1. Download A688 Tools from
http://www.megaupload.com/?d=IFO209MS
The latest version of A688 Tools can be downloaded from
http://snowwolf725.blogspot.com/2010/04/a688a60a88.html
2. Unpack A688 Tools into C:\A688_Tools
3. Reboot your mobile to FTM mode.
4. Execute "Dos_Console.bat" in A688_Tools folder.
5. Use "mkdir sdcard" command to make sdcard folder.
6. Use "mount -t vfat /dev/block/mmcblk0p1 /sdcard" command to mount SD card to sdcard folder.


How to look up partition table of your android phone.
Use "cat /proc/mtd" command to look up partition table of mobile.
$ cat /proc/mtd
The partition table of A688 with 1.6 rom:
dev:    size   erasesize  name
 mtd0: 00500000 00020000 "boot"
 mtd1: 00200000 00020000 "misc"
 mtd2: 00080000 00020000 "splash"
 mtd3: 00500000 00020000 "recovery"
 mtd4: 00500000 00020000 "ftm"
 mtd5: 01000000 00020000 "hidden"
 mtd6: 00060000 00020000 "dbgmsk"
 mtd7: 0a000000 00020000 "system"
 mtd8: 06400000 00020000 "cache"
 mtd9: 0ac80000 00020000 "userdata"
The partition table of A688 with 2.1 rom:
dev:    size   erasesize  name
 mtd0: 00500000 00020000 "boot"
 mtd1: 00200000 00020000 "misc"
 mtd2: 00080000 00020000 "splash"
 mtd3: 00500000 00020000 "recovery"
 mtd4: 00500000 00020000 "ftm"
 mtd5: 01a00000 00020000 "hidden"
 mtd6: 00060000 00020000 "dbgmsk"
 mtd7: 0a000000 00020000 "system"
 mtd8: 00200000 00020000 "misc2"
 mtd9: 05800000 00020000 "cache"
 mtd10: 0ab80000 00020000 "userdata"


Backup Splash,Boot,Recovery,FTM partitions

It is very easy to backup these partitions into image files.
Execute "Dos_Console.bat" in A688_Tools folder, and use "cat /dev/mtd/mtd0 > /sdcard/boot.img" command to backup mtd1 partition to /sdcard/boot.img
In 1.6 mobile, the mtd0 partiton is mapping to the boot partition


Backup Userdata, System, Hidden partitions

1. Execute "Dos_Console.bat" in A688_Tools folder.
2. Using the following commands to backup these partitions into image files:
C:\A688_Tools>adb push RomRepackTools_Linux\mkyaffs2image /sbin
 C:\A688_Tools>adb shell chmod 4777 /sbin/mkyaffs2image
 C:\A688_Tools>adb shell
 # mkdir /sdcard
 # mount -t vfat /dev/block/mmcblk0p1 /sdcard
 # mount -t yaffs2 /dev/block/mtdblock7 /system
 # mkyaffs2image /system /sdcard/system.img
 
 #mkdir /data
 # mount -t yaffs2 /dev/block/mtdblock9 /data
 # mkyaffs2image /data /sdcard/data.img
 
 #mkdir /hidden
 # mount -t yaffs2 /dev/block/mtdblock5 /hidden
 # mkyaffs2image /data /sdcard/hidden.img


Restore roms by using fastboot

Important: Don't flash hidden partition by using fastboot.If you flash hidden partition by using fastboot, you will get a empty hidden partion.
1. Reboot your mobile into fastboot mode
2. Execute "Dos_Console.bat" in A688_Tools folder.
3. Use "fastboot flash [partition name] [image file name]" to flash the partition in the mobile.
For example:
"fastboot flash boot boot.img" will flash the boot partition in mobile with boot.img.
fastboot flash boot boot.img
4. Use "fastboot reboot" to reboot your mobile
Other useful commands:
Earse the specified partition
fastboot erase [partition name]
Boot with specify boot image(This command is no effect in 2.1 mobile)
fastboot boot [image name]

How to update your videocon zeus from 1.6 stock to 2.1 Eclair


Warning This will void your warranty !!! And i am not responsible if you brick your phone !!! :)

But i think you cant brick it .. there will be some hope finally at the service center though !!
This procedure is very simple and tension free :)

Preparation:
you should have these two files ready.

1. spice 2.1 update file F0X-219M-0-5015-A01.nb0  >>or  Read Here
2.SUT-LR update Tool Get it >> HERE


INSTALLING SUT-LR UTILITY:

I hope you already downloaded the Software Update Tool from here SUTLR.ZIP else download it

Extract it to some folder in your pc

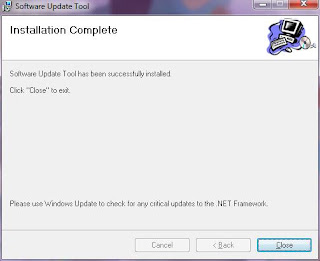
Then install it by running the Setup.exe inside

Then start SUT-LR program


it will open to show a screen like this


Connect your phone to the pc using USB cable


Click NEXT


Browse to the folder where you copied the F0X-219M-0-5015-A01.nb0
The screen should show phone is connected.(just making sure drivers are installed :)


Optionally ( I think its better to ) select ERASE DATA


PUTTING THE PHONE IN DOWNLOAD MODE


TURN OFF your phone

Start to Download Mode ( Press Red + Vol Up + Power Key )

It should show
 Flash item : SAMSUNG KG45******
Modem REV  FXX-2-19M-00
incomming download mod
 blah blah blah ….
Don’t have to rush let it go…printing….

Phone should be connected with the USB to the PC else connect it

Now click NEXT on the SUT-LR utility


Then

then

Finally it should give you a screen saying


 update successfull !!!


press FINISH or CONTINUE if you want to update to another ROM any thing as you like :) immediately :)


Either UPDATE Success or with an error code 0x4000 something don’t worry just try to manually switch on your phone it should work fine.


This is just because the reboot failed.. just power on manually and it should all work well.


This method can be used even on a bricked phone which is not booting.So this should work fine or else try again don’t panic J you can always go to Videocon service center and fix it if something terrible happens. I have tried it again and again it worked fine. I even came back to 2.1 and then went up  to 2.2.1 .. now I am looking for a 1.6 stock rom so I can try to come back to 1.6 stock. I will update this post as and when required.

Please share it if you find it useful…… J

Those who successfully done the update please post a comment/feedback. I might be integrating the VIDEOCON Startup and Boot Animation soon … so it will look like a stock version J


How to Back up Spice 2.1 Eclair stock update file


Warning Do not connect your phone to the pc during this procedure !!!
I am not responsible if anything happens to your pc or phone. :)


UPDATE: For your convenience i have uploaded it to mediafire.you can now skip this tutorial (unless you want to try it) and download the F0X-219M-0-5015-A01 directly

Extract it to a folder on your pc
Open the folder and Install it by running Setup.exe
 you will see


Click NEXT

Click NEXT

Click NEXT

Wait Till it finishes


It will close automatically and opens up a new window 


DO NOT PRESS NEXT BUTTON or DO NOT CLOSE IT 

COPYING THE 2.1 FLASH FILE:

Go to your installation folder .. normally …. 
C:\Program Files\Software Update Tool Setup\


Copy file named F0X-219M-0-5015-A01.nb0
Paste it somewhere safe.

Once you are sure that the file is copied out of that folder to some other place.Then only close the window.If you accidently press next and the phone is connected It will try to update the phone software ..so beware of this .. Do not close this window until you make sure you have copied the File F0X-219M-0-5015-A01. Closing the window will run some script which will delete all the files inside the installation folder. so u go there and see nothing.

i will try to upload this file to some place so you can direct download it from internet in future.

Please do share if you find it useful........ post some feedback in the comment section :)

Featured post

Step By Step Procedure for Updating to SuperAOSP [Videocon Zeus]

I have tried almost all available custom roms for the commtiva z51 or videocon zeus (spice mi 300 , Orange Boston variant) . For 2.2 Froyo i...